


After 6 weeks of nighttime feedings, sitz baths, afternoon naps, spit-up stained shirts, and the like, I got up enough energy and motivation to start thinking about another project. I thought we'd start off easy... with some crown molding in our bedroom.
But, as I soon found out, putting up crown molding and DIYing with a 6 week old in the house is a new kind of challenging for us.
Here & here are the two tutorials that we used that helped us work through the difficulties of installing crown molding. I won't be including a tutorial in this post since I barely understand the process still.
The thing about crown molding (and DIYing with a newborn in the house for that matter) is that it takes a lot longer than you think. Apparently, crown molding is a bit complicated to cut if you've never done it before. But the more you do it the easier it gets. We started on Saturday afternoon and were able to unsuccessfully install one piece and successfully uninstall that same piece.
Poor Michael, he was more than a little frustrated... all in 90+ degree heat and 100% humidity.
Yuck.
And I was helping on and off, whenever I could coax our little one into sleeping long enough for me to be a second set of hands.
But a day later and with a handy new little tool (seriously, if you installing crown for the first time, you need it), we were able to install the whole room.

A close up of our (Michael's) handiwork.

I feel like we have overcome a huge hurtle getting our first DIY done post baby.
It IS possible to accomplish something when you have a little one at home. You just have to be flexible, patient, and allow for extra time.
Right around the time we were finishing up the crown and putting the room back together, I found a new headboard for...get this, $15.

Now it's a bit more than we spent on our last headboard ($5) but we felt like it was time for an upgrade. #treatyoself

Originally I wanted an iron headboard, similar to our old one, but hey, for $15, a girl can change her plan. Unfortunately now our bedroom is feeling very heavy in wood stained finishes. Dresser, desk, chest, nightstand, headboard. I need some painted furniture in here, STAT!

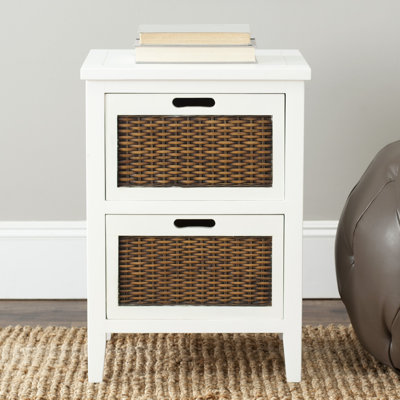
I'm thinking two white matching nightstands. And I've been looking for some, but apparently it is very hard to find two decent matching nightstands on craigslist. This one I found on Wayfair caught my eye. I like the wicker mixed with the white paint finish. But it's over my cheapo budget.
And I'd love to paint Michael's desk a linen/grey color.

This dresser will stay the same, it was my grandma's and I love the color of the wood with the color of the wall.

I stumbled upon RugsUSA, who was having a HUGE 70% off sale. I decided to buy this rug when I read all the positive reviews. Hopefully it will work out!

And then finally I have some family pictures to hang on the wall as soon as they come in the mail. Gotta see that cute little baby face all. the. time.

So after months of being preoccupied with decorating the nursery, it's nice to focus our attention to another room and continue making this fixer-upper into our dream home. Slowly but surely!
Don't miss a beat.
{Follow this blog on Bloglovin'}

-or-
{Follow this blog via Email}